


Ads by Google

Instruc NEW CE MA |
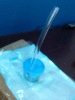
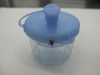
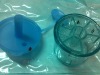
1.Connect Port A to the endoscope, and connect Port B to the suction system. 2.Rotate to make the arrow on lid point to the number of the chamber, and then start suctioning. After one specimen being trapped, rotate the lid to next chambers according Step 2 to do extra polyp trapping. When complete the polyp trapping, rotate the lid arrow to the Neutral position to pour out the waste fluid within the polyp trap. 3.Fill the polyp trap with formaldehyde solution and seal the Port A and Port B with the port cap. 4.Record the index numbers and the specimens accordingly and the polyp trap is ready to be sent out for inspection. Simple in-line installation Installs in only a few seconds between the endoscope and the suction receptacle.Clear plastic construction Allows visual verification of polyp collection.Unique design Provides flat surface for easy gripping and handling.Sized to fit into specimen jar Eliminates need for specimen handling and transfer.Luer lock design on base Allows syringe attachment to aid in sample removal.Cost-effective Offers money savings when polyp indexing andeffluent bypass are not needed.Individually packaged Reduces risk of biohazard and samplecontamination with single-patient use.Dispenser pack Allows easy identification and access to inventory. |
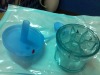
The Multi-chamber Polyp Suction Trap
Feature:
Individual packaging. Single-patient use (disposability) reduce biohazard and sample contamination risk.Easy in-line installation. In just a few seconds, the trap can be installed between the endoscope and suction receptacleFine-mesh screen allows it to capture even the smallest polypsMulti-chamber allows for multiple samplesEO sterile & hygienic individual packaging Clear plastic construction allows visual verification of polyp collectionReduces contact with patient effluent
CE marked
Simple installation between the endoscope and the suction Polyp Suction Trap